
- Licensed & Insured • EPA Lead-Safe Certified
Professional. Reliable. Affordable.
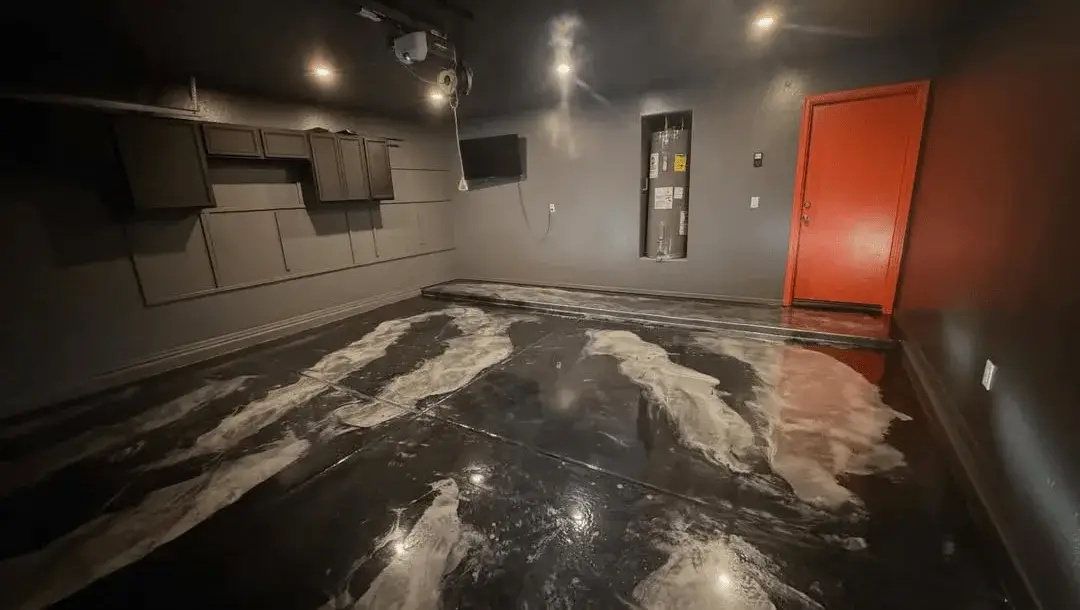
Epoxy Garage Flooring in Worcester, MA
Turn your stained, cracked, dusty garage floor into a beautiful, durable surface that’s easy to clean and built to last. Our professional epoxy flooring withstands Worcester winters, resists oil and chemicals, and makes your garage look amazing.
- Licensed & Insured
- EPA Lead-Safe Certified
- 5-Star Rated on Google
- 100% Free Estimates
Premium Epoxy Flooring for Worcester Garages
Epoxy garage flooring is a high-performance coating system applied directly to your concrete garage floor. It creates a seamless, durable, glossy surface that transforms your garage from a dusty storage space into a clean, attractive area you’ll actually want to spend time in.

Request Your Free Estimate Online
Ready to transform your home or business with professional painting? We make it easy. Request your free estimate online or give us a call. We’ll schedule a convenient time to visit your property, discuss your vision, and provide a detailed written quote—usually within 24 hours.
No pressure. No obligation. Just honest, professional service.
What Makes Epoxy Different from Regular Garage Paint
Two coatings. Two completely different outcomes. Here’s the honest comparison.
Epoxy Floor Coating
A true investment that pays off for over a decade.
- Thick, multi-layer system (not just paint)
- Chemical bond with concrete (becomes part of the floor)
- Extremely durable (lasts 10–15+ years)
- Resists chemicals, oil, salt, and abrasion
- High-gloss finish that brightens garage
- Professional installation required
Regular Garage Floor Paint
A short-term fix that disappoints within a year or two.
- Thin coating that sits on surface
- Peels and chips within 1–2 years
- Poor chemical resistance
- Limited durability
- DIY-friendly but disappointing results
Bottom line: Epoxy is an investment that pays off. Paint is a temporary fix that fails.
Why Epoxy is Perfect for Worcester Garages
From brutal road salt to sub-zero freeze-thaw cycles — epoxy is engineered for everything Worcester throws at it.
Worcester Winter Survival
- Road salt resistance: Won't damage or discolor from salt tracked in
- Freeze-thaw durability: Handles temperature swings without cracking
- Snow melt protection: Water beads up and won't penetrate
- Chemical resistance: De-icing chemicals can't harm it
Year-Round Benefits
- Oil and fluid resistance: Car leaks wipe up easily
- Stain-proof surface: Spills don't penetrate or stain
- Dust elimination: Seals concrete so no more concrete dust
- Easy cleaning: Quick sweep or mop keeps it spotless
- Bright appearance: Reflects light, makes garage feel larger
- Increased home value: Impressive upgrade for potential buyers
Perfect for Worcester's Mix of Garages
From historic detached garages to modern multi-car spaces — we coat them all.
What You Can Use Your Epoxy Garage For
One floor, endless possibilities. Here’s how Worcester homeowners are using their new space.

Car Storage
- Protects floor from leaks and drips
- Easy cleanup of mud, salt, and grime
- Showroom-quality appearance

Workshop
- Chemical and solvent resistant
- Easy to find dropped parts (bright surface)
- Durable against heavy tool use

Hobby Space
- Clean environment for projects
- Wipe-clean surface
- Professional appearance

Home Gym
- Impact-resistant flooring
- Easy to clean sweat and spills
- Non-slip options available

Multi-Purpose
- Kids' play area (easy to clean)
- Party and entertaining space
- Storage with style
One Floor.
Endless Use Cases.
Whatever your garage becomes — epoxy adapts to it. Built tough. Built to look great.
Benefits of Professional Epoxy Installation
Ten reasons Worcester homeowners choose professional epoxy over DIY paint kits.
Durability
10–15+ years with proper care (vs. 1–2 years for paint).
Chemical Resistance
Oil, gas, antifreeze, salt, cleaners, solvents — no problem.
Impact Resistance
Withstands dropped tools, jacks, and heavy equipment.
Stain Resistance
Everything wipes clean — no permanent marks or discoloration.
Moisture Barrier
Protects concrete from water damage and seepage.
Temperature Tolerance
-40°F to 140°F — perfect for New England extremes.
UV Stability
Won't yellow or fade from sunlight exposure.
Low Maintenance
Just sweep and an occasional mop — that's it.
Aesthetic Appeal
High-gloss showroom finish that turns heads.
Increases Property Value
A premium upgrade buyers notice instantly — adding measurable value to your Worcester home.
SECTION 3 · OUR PROCESS
PROFESSIONAL EPOXY INSTALLATION
Our 5-Step Epoxy Garage Floor Installation Process
Professional installation is critical for epoxy flooring. DIY kits fail because proper surface preparation is difficult and the application requires experience. We’ve perfected a system that delivers flawless, long-lasting results.
5
Precision Steps
15+
Years Lifespan
3
Days Installation


WHY OUR PROCESS WORKS
Engineered for floors that last 15+ years.
DIY epoxy kits and shortcut contractors fail for one reason — improper preparation and application. Our proven 5-step system was perfected over hundreds of installations to deliver showroom results that stand up to heat, oil, chemicals, and daily wear.
Diamond Grinding
Maximum bond strength.
Proper Cure Time
No shortcuts taken.
Premium Materials
2-part epoxy systems.
Layered System
Primer + base + top.
From bare concrete to showroom finish
THE 5-STEP SYSTEM
Each step is mission-critical. Skip one and your floor fails — that’s why 90% of DIY jobs peel within a year. Here’s exactly how we do it right, every time.
PROCESS
Step 1: Surface Preparation
Why this matters: Epoxy only bonds to properly prepared concrete. Poor prep is why 90% of DIY epoxy jobs fail within a year. We spend more time on prep than anything else — it’s the foundation of a successful installation.
- Check for cracks, spalling, or damage
- Test moisture levels (high moisture prevents bonding)
- Assess concrete age and condition
- Identify any problem areas
- Check for cracks, spalling, or damage
- Test moisture levels (high moisture prevents bonding)
- Assess concrete age and condition
- Identify any problem areas
- Fill all cracks with epoxy crack filler
- Repair spalled or damaged areas
- Level any uneven sections
- Ensure structural integrity
- Diamond grinding (our preferred method): opens concrete pores for bonding
- OR acid etching: chemical treatment to create profile
- Creates proper surface texture for epoxy adhesion
- Removes existing coatings, sealers, or contaminants
- Remove all dust, dirt, and debris
- Degrease any oil spots (critical!)
- Power wash and vacuum
- Allow floor to dry completely (24-48 hours)
- Remove all dust, dirt, and debris
- Degrease any oil spots (critical!)
- Power wash and vacuum
- Allow floor to dry completely (24-48 hours)
- Verify surface is clean and dry
- Check for remaining contaminants
- Test adhesion on small area
- Confirm moisture levels are acceptable


02
Step 2: Primer Coat Application
What it does: Primer creates the chemical bond between concrete and epoxy. It penetrates deep into concrete pores and provides the foundation for the colored epoxy layers.
- Mix two-part epoxy primer precisely
- Apply with rollers for even coverage
- Work in sections for consistent application
- Ensure complete coverage with no thin spots
- Allow proper cure time (typically 12-24 hours)
- Mix two-part epoxy primer precisely
- Apply with rollers for even coverage
- Work in sections for consistent application
- Ensure complete coverage with no thin spots
- Allow proper cure time (typically 12-24 hours)
Some contractors skip primer to save time and money. This leads to delamination — epoxy peeling off the concrete. We ALWAYS use primer.
Get Free Estimate →
PROCESS
03
Step 3: Base Coat Epoxy Application
The Main Color Layer: This is the primary epoxy coating that gives your floor its color and creates the durable surface.
- Mix two-part epoxy system (resin + hardener)
- Custom color mixing if needed
- Apply thick, even coat with professional rollers
- Work systematically to avoid missed spots
- Maintain wet edge for seamless finish
- Typically 10-20 mils thick (much thicker than paint)
Gray Tan White Blue Red Black Green Custom Colors Decorative Flake
Walkable
24 hrs
Light Use
48-72 hrs
Full Cure
7 Days


04
Step 4: Decorative Flake Broadcast
What are flakes? Colored vinyl chips broadcast into wet epoxy. They create a beautiful speckled appearance, add texture for slip resistance, and hide imperfections in concrete.
- Attractive multi-color appearance
- Hides dirt and tire marks better than solid colors
- Adds slight texture (slip resistance)
- Camouflages any floor imperfections
- Classic garage floor look
Popular Blends
Partial: 25-50% coverage (lighter look)
Accent: Minimal flakes (subtle effect)
Color Combinations
Gray / Black / White (classic)
Tan / Brown / Beige (warm)
Blue / Gray / White (contemporary)
Custom blends available
- Broadcast flakes into wet base coat epoxy
- Cover as desired (full or partial)
- Allow to cure
- Scrape off excess flakes
- Vacuum thoroughly
PROCESS
05
Clear Top Coat
The Final Layer: A clear polyurethane or epoxy top coat seals everything and provides the final glossy finish.
- Locks in flakes (if used)
- Provides final protection layer
- Creates high-gloss shine
- Adds UV resistance
- Makes cleaning easier
- Provides chemical resistance
Our Top Coat
High-performance polyurethane (most durable) OR clear epoxy (higher gloss). Two coats for maximum protection. Anti-slip additives available if needed.
Final Result
High-gloss showroom finish, smooth seamless surface, durable chemical-resistant coating, beautiful appearance that lasts.

Total Installation Timeline
Day-by-day breakdown so you know exactly what to expect from start to drive-on day.
Preparation
Crack repair
Grinding or etching
Cleaning
Drying
Primer & Base Coat
Prime application
Cure time (12-24h)
Base coat epoxy
Flake broadcast
Top Coat
Scrape excess flakes
First clear coat
Second clear coat
Curing
Day 4 — light foot traffic
Day 5 — light use
Day 7 — drive on it
Total Project Time
3 days professional installation + 4-7 days proper cure time
~ 7 DAYS START TO DRIVE
Epoxy vs. Other Garage Flooring Options
Choosing the right garage floor is a long-term investment. Compare epoxy coatings against paint, interlocking tiles, and polished concrete — side by side — and discover which option truly delivers durability, beauty, and value for Worcester homeowners.
Years Lifespan
Chemical Resistant
Pro Installation
Showroom Finish
Worcester Winter Ready
The Complete Comparison Table
| Feature | Epoxy Coating | Garage Floor Paint | Interlocking Tiles | Polished Concrete |
|---|---|---|---|---|
| Durability | 10-15+ years | 1-2 years | 5-10 years | 15+ years |
| Installation | Professional (3 days) | DIY (1 day) | DIY (1 day) | Professional (2-3 days) |
| Cost | $$$ | $ | $$ | $$$$ |
| Chemical Resistance | Excellent | Poor | Good | Fair |
| Stain Resistance | Excellent | Poor | Good | Requires sealer |
| Maintenance | Low (sweep/mop) | Medium (touch-ups) | Medium (clean joints) | Low (dust/mop) |
| Winter Performance | Excellent | Poor (peels) | Good | Good |
| Appearance | High-gloss showroom | Flat/matte | Modular look | Industrial |
| Best For | Permanent solution | Temporary/budget | Renters/temporary | Modern aesthetic |
Pros, Cons & Best Use Cases
Every flooring option dissected — so you can make a confident, informed decision for your garage.

Epoxy Coating
✓ Pros
- Longest-lasting option for the price
- Professional appearance
- Excellent chemical & stain resistance
- Easy to clean and maintain
- Handles Worcester winters perfectly
- Increases home value
✕ Cons
- Requires professional installation
- 7-day cure time before full use
- Higher upfront cost than paint
- Permanent (difficult to remove)
Best For: Homeowners wanting a permanent, high-quality solution.

Garage Floor Paint
✓ Pros
- Cheapest option
- DIY-friendly
- Quick project
- Better than bare concrete
✕ Cons
- Peels and chips quickly
- Repaint every 1-2 years
- Poor durability
- Limited chemical resistance
- Not a long-term solution
Best For: Temporary fix or tight budget only.

Interlocking Floor Tiles
✓ Pros
- DIY install (snap together)
- Take with you if you move
- Immediate use (no cure time)
- Variety of colors and styles
- Replace individual damaged tiles
✕ Cons
- Dirt & moisture under tiles
- Edges curl or separate
- More expensive than epoxy/sqft
- Joints collect dirt
- Not as seamless as epoxy
Best For: Renters or people wanting removable flooring.

Polished Concrete
✓ Pros
- Extremely durable
- Modern industrial look
- Low maintenance
- Very long-lasting
✕ Cons
- Most expensive option
- Specialized equipment required
- Limited color options
- Requires sealing for stain resistance
- Cold and hard surface
Best For: Modern homes, commercial spaces, design-focused projects.
For Most Worcester Homeowners — Epoxy Wins.
Professional epoxy coating offers the best combination of durability, appearance, cost, and performance. It handles our winters, looks amazing, and lasts 10-15+ years with minimal maintenance.
- Best lifespan-to-cost ratio in the industry
- Showroom-quality finish that boosts home value
- Built to handle salt, oil, chemicals & freeze cycles
- Sweep-and-mop simple maintenance for years
Custom Colors & Finishes for Your Epoxy Garage Floor
Design a garage floor that matches your style — from neutral, dust-hiding grays to bold automotive reds and decorative flake blends with showroom-grade clear coats.

Pick a Solid Color That Fits Your Garage
From popular dust-hiding neutrals to bold statement colors — every shade is mixed to spec and applied with a high-build epoxy base.
Neutral Colors — Most Popular
Light Gray
Classic, bright, hides dust beautifully.
Medium Gray
Most popular — versatile and timeless.
Dark Gray / Charcoal
Modern, sophisticated, premium feel.
Tan / Beige
Warm, traditional, complements brick.
White / Off-White
Bright & clean — shows tire marks more.
Bold Colors
Blue
Contemporary, popular choice.
Red
Bold, automotive-themed showroom look.
Black
Sleek, dramatic — shows dust more.
Green
Unique, less common, stands out.
Any Color You Want
Bring a sample or chip — we color match.
Custom Colors Available
We can match almost any color — bring us a sample, fabric swatch, or paint chip and we'll formulate a perfect match for your garage.
Decorative Flake Systems — Most Popular
Colored vinyl flakes broadcast into wet epoxy create a stunning terrazzo-like appearance that hides imperfections and adds texture.
How It Works
Colored vinyl flakes are hand-broadcast into a wet pigmented epoxy base. Once cured, excess is scraped and a clear top coat locks them in — creating a durable, terrazzo-like finish.
Classic Blends
Domino · Black/White/Gray
Most popular — hides everything, works with any decor.
Concrete · Gray/Tan/White
Natural look, complements stone and brick homes.
Mocha · Brown/Tan/Beige
Warm, inviting, traditional appeal.
Granite · Multi-Gray
Stone-like appearance with depth and texture.
Contemporary Blends

Ocean · Blue/White/Gray
Cool, modern, refreshing aesthetic.
Glacier · White/Silver/Blue
Bright, clean, ultra-modern feel.
Sunset · Red/Copper/Gold
Warm, energetic, eye-catching tones.
Forest · Green/Brown/Tan
Natural, earthy, organic appeal.
Custom Flake Blends
Mix your own colors for a one-of-a-kind appearance — perfect for sports teams, brand colors, or completely unique design statements.
Choose Your Flake Coverage Level
Control how dense the flakes appear — from full broadcast for maximum impact to a light accent.
Full Broadcast
Maximum coverage, classic look — hides imperfections best.
Partial Broadcast
More base color shows through for a balanced finish.
Light Broadcast
Subtle accent — base color is the star of the show.
Choose Your Final Finish Sheen
From mirror-bright high-gloss to a subtle matte — pick the look that suits your space.
High-Gloss
- Reflective, shiny surface
- Brightens the entire garage
- Showroom-quality appearance
- Easiest surface to clean
Satin
- Softer, refined sheen
- Less reflective glare
- Still very easy to clean
- More subtle appearance
Matte
- No shine, fully flat finish
- Contemporary, modern look
- Hides surface imperfections
- Less common for garages
Anti-Slip Additives Available
Add non-slip aggregate to any finish for extra traction — ideal for snowy, icy, or wet New England conditions.
Most Popular Combination in Worcester
After hundreds of installations, this is the recipe homeowners choose again and again.
The Recipe
- Hides dirt, tire marks, and salt stains
- Bright, clean, showroom-grade appearance
- Classic look that never goes out of style
- Effortless maintenance — wipe & go
- Works with any garage decor or vehicle
Design Your Perfect Garage Floor Today
Speak with our Worcester epoxy specialists — free in-home estimates, color samples, and no-pressure consultations.
Epoxy Garage Flooring Cost in Worcester, MA
Transparent Pricing for Your Garage Transformation. Honest numbers, no hidden fees — see exactly what your project will cost before we lift a finger.
Professional Lifespan
Standard Pricing (Per Square Foot)
Three professional systems engineered for every garage, every budget, every lifestyle.
Single solid color with reliable durability.
- Surface prep & priming
- Base coat epoxy
- Clear top coat
- Single solid color
Beautiful flake broadcast with hidden texture & grip.
- Full surface prep & primer
- Base coat + flake broadcast
- Clear top coat
- Most popular option
Maximum durability, depth, and showroom finish.
- Extra prep & multiple base coats
- Full flake broadcast
- Two clear coats
- Maximum durability & appearance
Pricing by Typical Garage Sizes
From compact 1-car spaces to spacious 3-car garages — here’s what homeowners across Worcester are investing.
1-Car Garage (250–300 sq ft)
Basic Epoxy
Flake System
Premium System
2-Car Garage (400–550 sq ft)
Basic Epoxy
Flake System
Premium System

3-Car Garage (650–850 sq ft)
Basic Epoxy
Flake System
Premium System
What Affects Your Price
Four real-world variables shape your final quote — here’s exactly how each one plays out.
Size Factors
- Larger garages = lower price per square foot
- Small garages (under 200 sq ft) may have minimum charge
Condition Factors
- Good concrete: Standard pricing
- Cracked concrete: Add $200–500 for repairs
- Heavily damaged: Add $500–1,500 for extensive repair
- Existing coating removal: Add $1–2 per sq ft
Complexity Factors
- Multiple colors or patterns: Add 15–25%
- Concrete resurfacing needed: Add significantly
- Moisture treatment: Add $300–800
Location Factors
- Ground-level garage: Standard pricing
- Basement garage: May require moisture barrier (add cost)
- Difficult access: May affect pricing
What's In, What's Extra
No surprises. Here’s exactly what every quote includes — and the few add-ons that may apply.
What's Included in Our Pricing
- Complete surface prep (grinding/etching)
- Crack & damage repair (minor)
- Professional-grade epoxy materials
- Primer coat
- Base coat (your color choice)
- Decorative flakes (if selected)
- Clear top coat (1–2 coats)
- All labor & installation
- Cleanup & debris removal
- Satisfaction guarantee
What Costs Extra
- Major concrete repairs / resurfacing
- Removal of existing coatings (oil paint, old epoxy)
- Custom color matching
- Anti-slip additives
- Concrete sealing underneath (moisture barrier)
- Wall painting or other garage upgrades
Financing Options
We offer flexible payment plans for qualified homeowners. Ask about our financing options during your free estimate — and turn your dream garage into an affordable monthly payment.
Why Professional Installation is Worth the Investment
A side-by-side reality check on what you actually get for your money — over 1 year, and over a decade.
Hardware Store Kit
- Fails within 1–2 years (poor prep, thin coating)
- No warranty or guarantee
- Frustrating application process
- Often needs professional fix afterward
- Total waste of money and time
Done Right, Once
- Lasts 10–15+ years
- Perfect surface preparation
- Proper coating thickness
- Beautiful, even finish
- Warranty and guarantee
- Cost per year: $200–400 (vs DIY $200–500/yr!)
Ready For Your Free On-Site Estimate?
Get a transparent, written quote tailored to your garage in Worcester, MA — usually within 24 hours.
Interior Painting Gallery - Worcester & Central MA

Victorian Living Room Transformation
After: Benjamin Moore Revere Pewter walls, crisp white trim
Timeline: 3 days | Lead-safe certified work
Modern Kitchen Refresh
After: Benjamin Moore Simply White – fresh and clean
Timeline: 2 days | Satin finish for easy cleaning
Master Bedroom Sanctuary
After: Benjamin Moore Stonington Gray with tray ceiling detail
Timeline: 2 days | Eggshell finish

Home Office - Video Ready
After: Sherwin-Williams Naval accent wall, Repose Gray on other walls
Timeline: 2 days | Perfect for video calls
Historic Colonial Restoration
After: Classic Benjamin Moore White Dove throughout
Timeline: 4 days | Lead-safe work (1890s home), extensive repairs

Kids' Playroom Durability
After: Sherwin-Williams Sea Salt (soft blue-green)
Timeline: 2 days | Satin finish – scrubbable for kids
Reviews
Don’t just take our word for it. Here’s what your neighbors have to say.
★★★★★
“We needed our entire first floor painted before hosting family for the holidays. Worcester Painting Co came through with flying colors—literally! They were professional, punctual, and the quality exceeded our expectations.”
Worcester, MA
Interior Painting – Whole House
★★★★★
“After getting three quotes, Worcester Painting Co wasn’t the cheapest, but they were the most thorough and transparent. The house looks incredible. Neighbors keep stopping to compliment it!”
Shrewsbury, MA
Exterior Painting – Colonial Home
★★★★★
“We have a beautiful 1890s Victorian but were worried about lead paint with our toddler. Worcester Painting Co is EPA certified and handled everything safely and professionally. Total peace of mind.”
Worcester, MA (Main South)
Lead-Safe Interior Painting
★★★★★
“I was ready to spend $15,000 replacing our kitchen cabinets. Worcester Painting Co refinished them for a fraction of that cost and they look BRAND NEW. Saved us a fortune!”
Auburn, MA
Cabinet Painting
★★★★★
“We needed our entire first floor painted before hosting family for the holidays. Worcester Painting Co came through with flying colors—literally!”
Worcester, MA
Interior Painting – Whole House
★★★★★
“After getting three quotes, Worcester Painting Co wasn’t the cheapest, but they were the most thorough and transparent.”
Shrewsbury, MA
Exterior Painting – Colonial Home
★★★★★
“We have a beautiful 1890s Victorian but were worried about lead paint with our toddler. Total peace of mind.”
Worcester, MA (Main South)
Lead-Safe Interior Painting
★★★★★
“I was ready to spend $15,000 replacing our kitchen cabinets. They look BRAND NEW. Saved us a fortune!”
Auburn, MA
Cabinet Painting
Reviews
Don’t just take our word for it. Here’s what your neighbors have to say.
★★★★★
“We have a beautiful 1890s Victorian but were worried about lead paint with our toddler. Worcester Painting Co is EPA certified and handled everything safely and professionally. Total peace of mind.”
Worcester, MA (Main South)
Lead-Safe Interior Painting
★★★★★
“I was ready to spend $15,000 replacing our kitchen cabinets. Worcester Painting Co refinished them for a fraction of that cost and they look BRAND NEW. Saved us a fortune!”
Auburn, MA
Cabinet Painting
★★★★★
“We needed our entire first floor painted before hosting family for the holidays. Worcester Painting Co came through with flying colors—literally! They were professional, punctual, and the quality exceeded our expectations.”
Worcester, MA
Interior Painting – Whole House
★★★★★
“After getting three quotes, Worcester Painting Co wasn’t the cheapest, but they were the most thorough and transparent. The house looks incredible. Neighbors keep stopping to compliment it!”
Shrewsbury, MA
Exterior Painting – Colonial Home
Frequently Asked Questions
Professional Installation:
- Typical lifespan: 10-15 years
- High-quality systems: 15-20+ years
- Commercial-grade systems: 20+ years
Factors Affecting Lifespan:
Installation Quality (Most Important):
- Proper surface prep = long life
- Poor prep = failure within 1-2 years
- This is why professional installation matters
Traffic and Use:
- Residential garage (normal use): 15+ years
- Heavy workshop use: 10-12 years
- Daily multiple vehicle traffic: 12-15 years
Maintenance:
- Well-maintained: Maximum lifespan
- Neglected: Shorter lifespan
- Regular cleaning extends life
Environmental Factors:
- Worcester winters with salt: Our epoxy handles it fine
- Proper top coat protects against UV and chemicals
- Indoor garage (no direct sun): Longest life
Comparison to Other Options:
- Garage floor paint: 1-2 years
- Interlocking tiles: 5-10 years
- Epoxy coating: 10-15+ years
- Polished concrete: 15-20+ years
What Causes Premature Failure:
- Poor surface preparation (DIY mistakes)
- Skipping primer coat
- Thin coating application
- High concrete moisture not addressed
- Existing sealers not removed
Our Warranty: We warranty our installation workmanship. If epoxy fails due to installation error, we fix it.
Temperature Requirements:
Air Temperature:
- Minimum: 50°F during application
- Ideal: 60-85°F
- Maximum: 95°F
Concrete Temperature:
- Should be 50°F+ and rising
- Cold concrete doesn’t allow proper bonding
- Takes longer to cure in cold
Best Installation Seasons in Worcester:
Spring (April-May): Good
- Warming temperatures
- Garage temps stabilize above 50°F
- Concrete dries well
Summer (June-August): Ideal
- Perfect temperatures
- Fast cure times
- Dry conditions
Fall (September-October): Good
- Still warm enough
- Comfortable working conditions
- Must finish before November cold
Winter (November-March): Not Recommended
- Too cold for proper application
- Slow cure times
- Risk of improper bonding
- Most garages drop below 50°F
Heated Garages (Exception): If your garage is heated and maintains 60°F+ consistently, winter installation is possible. Rare in Worcester.
Why Temperature Matters:
- Epoxy won’t cure properly in cold
- Bond strength is compromised
- Extended cure time (weeks instead of days)
- Risk of failure
Our Recommendation: Schedule your epoxy installation for May through October for best results.
Planning Ahead: Book early spring installations in late winter for best scheduling.
Detailed Maintenance Guide:
Daily/Weekly:
- Sweep or dust mop to remove dirt and debris
- Wipe up spills promptly (though epoxy is stain-resistant)
- Remove leaves, snow, and tracked-in materials
Monthly:
- Mop with mild cleaner and water
- Use soft-bristle broom or mop (no abrasives)
- Rinse with clean water
- Dry or let air dry
Best Cleaning Products:
- Simple Green (diluted)
- Mild dish soap and water
- Commercial epoxy floor cleaner
- Neutral pH cleaners
Avoid:
- Harsh chemicals (bleach, ammonia in high concentrations)
- Abrasive scrubbers (steel wool, hard brushes)
- Citrus or acidic cleaners (can dull finish over time)
- Degreasers with high alkaline content
Winter Care in Worcester:
Salt and Snow:
- Epoxy handles road salt perfectly
- Sweep up salt and snow melt regularly
- Occasional mopping removes salt residue
- No special treatment needed
Snow Removal:
- Plastic snow shovels are fine
- Metal shovels won’t damage epoxy (but be reasonably careful)
- Snow blowers are safe to use
Preventing Damage:
Protecting Against:
- Heavy impacts: Generally fine, but avoid dropping very heavy items from height
- Hot tires: Not an issue, epoxy handles heat
- Sharp objects: Avoid dragging sharp metal across floor
- Jack stands: Use rubber pads if concerned (not required)
What’s Safe:
- Car jacks and jack stands
- Rolling tool chests
- Motorcycles and bikes
- Storage shelving
- Normal garage equipment
Long-Term Care:
Years 1-5:
- Minimal maintenance
- Looks great with basic cleaning
Years 5-10:
- May want to apply new top coat for fresh gloss
- Minor touch-ups if needed
- Still looks good with regular cleaning
Years 10-15:
- Consider top coat refresh
- Inspect for wear in high-traffic areas
- Small repairs if needed
Annual Inspection:
- Check for any cracks or chips
- Look for areas of wear
- Address small issues before they become big
Reality Check: Epoxy garage floors are one of the lowest-maintenance flooring options available. Most homeowners do nothing beyond occasional sweeping and mopping.
Standard High-Gloss Epoxy:
- Smooth, glass-like finish
- Can be slippery when wet (water, snow, ice)
- Not usually a problem for normal garage use
- Be cautious when floor is wet
Anti-Slip Solutions:
Option 1: Anti-Slip Additives
- Fine aggregate mixed into top coat
- Creates slight texture
- Maintains most of the gloss
- Reduces slip significantly
- Small additional cost ($0.50-1.00/sq ft)
Option 2: Full Broadcast Flakes
- Vinyl flakes provide texture
- Natural slip resistance
- Still glossy but textured surface
- Most popular option
Option 3: Shark Grip or Sand Additives
- Coarser texture
- Maximum slip resistance
- Slightly reduces gloss
- Good for steep driveways
Worcester Winter Considerations:
Snow and Ice Tracking:
- Common in Worcester garages
- Anti-slip additives recommended
- Makes walking safer
- Doesn’t compromise durability
Our Recommendation:
- Standard garage: Flake broadcast provides adequate slip resistance
- Concerns about slipping: Add anti-slip additive to top coat
- Steep driveway garage: Definitely use anti-slip
Testing: We can show you samples of different slip-resistance levels to help you decide.
Over Existing Epoxy:
Well-Bonded Epoxy:
- If existing epoxy is in excellent condition
- Properly adhered to concrete
- No peeling or delamination
- We can sand and coat over it
Failing Epoxy:
- Must be removed completely
- Peeling or flaking epoxy won’t support new coating
- Removal required (diamond grinding)
Over Garage Floor Paint:
Not Recommended:
- Paint doesn’t bond well enough to support epoxy
- Will cause new epoxy to fail
- Must be removed first
Removal Process:
- Diamond grinding removes paint
- Chemical strippers for stubborn areas
- Adds to project cost but necessary
- Ensures proper bond
Over Sealers:
Concrete Sealers:
- Must be removed (prevents epoxy bonding)
- Grinding or chemical stripping required
- Cannot epoxy over sealed concrete
Best Practice:
Our Recommendation: Remove existing coatings for:
- Best bond strength
- Longest lifespan
- Warranty coverage
- Peace of mind
Cost Consideration:
- Coating removal: $1-2 per sq ft additional
- Worth it for permanent results
- Cheaper than re-doing failed epoxy later
Free Assessment: During estimate, we’ll inspect your existing floor and recommend best approach.
24 Hours:
- Light foot traffic OK
- Walk on it carefully
- No heavy objects
- No driving
48-72 Hours:
- Normal foot traffic
- Light items can be placed
- Still no vehicles
- No heavy loads
5-7 Days:
- Full vehicle traffic OK
- Park cars
- Normal garage use
- Drive on without worry
7-14 Days:
- Maximum strength reached
- Full cure nearly complete
- Heavy equipment OK
- All normal use
30 Days:
- Complete chemical cure
- Maximum hardness
- Full chemical resistance
- Peak performance
Why the Wait?
Chemical Cure Process:
- Epoxy hardens through chemical reaction
- Takes time to reach full strength
- Premature use can damage coating
- Patience ensures longevity
Temperature Effects:
- Warmer temps: Faster cure
- Cooler temps: Slower cure
- We’ll give you specific timeline for your project
What Happens if You Don’t Wait:
- Tire marks in soft epoxy
- Reduced bond strength
- Potential coating failure
- Shortened lifespan
Planning Ahead:
During Installation:
- Plan to park elsewhere for 1 week
- Street parking, driveway, friend’s garage
- Worth the inconvenience for 15-year floor
Scheduling:
- Consider vacation week
- Warm months (faster cure)
- Plan vehicle storage ahead
We’ll Help You Plan: During estimate, we’ll discuss your schedule and help you plan for the 1-week cure period.
Ready to Transform Your Space?
Get your free, no-obligation estimate today. Most quotes delivered within 24 hours. No pressure. No sales gimmicks. Just honest, professional painting service.
- Licensed & insured
- Free estimates, no obligation
- Premium materials
- EPA lead-safe certified
- Transparent, detailed quotes
- Workmanship guarantee
“Professional, punctual, and the quality exceeded our expectations. Worth every penny!” — Jennifer M., Worcester, MA